Apr 12, 2015 | Baking, Entrees, Nut Free

We’re one layer of cheese away from the final bake – oh, man talk about full meal deal!
Yes, you read that right! Steak and potatoes or pizza – who said you needed to choose? While I love a good steak and potato dinner, putting it on pizza just put this whole thing over the top. As you might have guess from this site, I am a sucker for fusions of flavours. And one of my favourites has to be Italian with Cajun as with this pizza.
The only thing I have to warn you about is that it takes a bit of prep. But the results were oh so awesome!
Blackened Steak & Potato Pizza
1 recipe Brazilian Pizza Crust
8 oz (225 g) steak
1 large russet potato
Pepper Jack cheese (shredded by you – guaranteed GF that way!)
Provolone cheese (slices)
Cajun Seasoning
Olive Oil
Red Onion (optional) or Cola Cajun BBQ sauce
Chives
The first thing to do is make your Cajun Baked Tater …

These would be good even if they weren’t on the pizza!
- Pre-heat your oven to 425 degrees while you start to slice your baker. You’ll want to make each slice about 1/8th of an inch thick but not all the way through on the bottom. Leave about a quarter of the potato on the bottom. You could use toothpicks to keep the sides together if you cut through the potato to the bottom (like me!).
- Drizzle the baker with olive oil and a healthy amount of the Cajun seasoning. Bake for about 50 minutes – remember, it will cook up a bit more on your pizza when it is in the oven.
Now to assemble the Cajun Steak & Potato Pizza – while the baker is in the oven you can start working on the other components …
- You might want to cook your steak before you start working on your pizza dough. The steak is best pan fried with lots of Cajun seasoning. And this is where you should make the choice of onions cooked with the steak or using the BBQ sauce for the base of the pizza.
- Cook the steak to a little below the rareness that you like – it will cook up as it sits as well as in the oven (like the potatoes). Cut the steak into slices about a quarter inch thick.
- After you’ve done your first bake to set the dough, layer in the following order: Provolone slices, BBQ sauce and then steak or steak and onions, potato slices and then topped with Pepper Jack. Then into the oven for the final bake.
- Top with chives and serve immediately!
Apr 1, 2015 | Dairy Free, Egg Free, Nut Free, Sauces & Seasonings
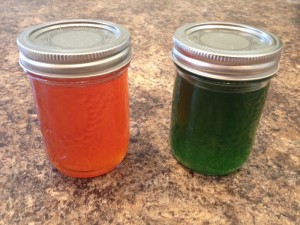
The jar on the left is Habanero Jelly and on the right is the Jalapeno Jelly. The jelly should last for quite awhile – this jalapeno jelly was still good after three years. Be careful about preparation and sanitation though if you plan on keeping it that long.
When I was a young warthog, er, when I was a young boy, I loved Peanut Butter and Jelly sandwiches. Grape was my favourite flavour. As I got older, it was a guilty pleasure at times, but of course that was all BCD. So as a guilty pleasure goes, it went out the window.
Of course PBJs are not the only way to enjoy jelly. And it definitely is not a great way to enjoy Pepper Jelly. This spicy sweet goodness goes amazingly well with cream cheese and bagels or a personal favourite is with cheese ball and crackers – obviously both the bagel and crackers would be GF!
Pepper Jelly
2 pounds (900 g) peppers (Habanero for really hot jelly or Jalapeno for a milder jelly)
2.5 cups (625 ml) apple cider vinegar
2 – 1.75 ounce (100 g) packages powdered pectin
10 cups (2.2 kg) sugar
- Wearing rubber gloves, take the stem off the top of peppers and puree the peppers as fine as possible in a food processor.
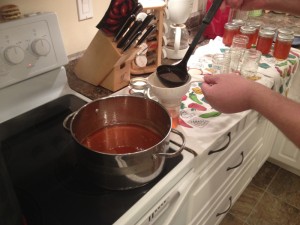
- Combine the puree and 4 cups water in a large non-corrodible pot and place over medium heat. When the liquid comes to a simmer, reduce the heat to medium and cook for about 10 minutes, stirring occasionally.
- Pour the hot puree into a jelly bag or a strainer lined with a dampened cheesecloth. Let the juice drip for an hour, stirring occasionally.
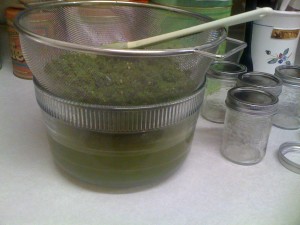
This would be the straining process. I didn’t bother with a cheesecloth because in this case I have a fine mesh colander that works just as well.
- Pour the strained juice into a non-corrodible pot; there should be approximately 4 cups. Add water equal to this amount. Add the vinegar and pectin, stir well.
- Bring to a full boil and add the sugar. Bring the contents to a boil that cannot be stirred down and stir for 1 minute.
- Immediately ladle the hot liquid into hot sterilized jars, leaving ¼ inch headspace, and seal. Refrigerate any jars that do not seal and use within 2 weeks. Note – if you don’t like the colour, you can add a little food colouring. That won’t alter the taste or texture.
Precautions:
Mar 11, 2015 | Desserts, Egg Free, Nut Free, Sauces & Seasonings
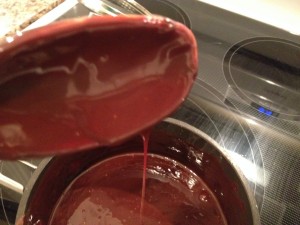
This is about what it should look like once you’re ready to start cooling.
Typically a chocolate ganache is used to enrobe a cake in a sweet chocolate frosting that hardens into a smooth glossy shell. It’s really simple to make a ganache, making your cake look pretty and easy to decorate if that’s the way you want to go!
This recipe utilizes Bailey’s Irish Cream or any other Irish Cream instead of whipping (heavy) cream. Additionally if you decide to use cream, you could technically use any other type of chips such as white chocolate or butterscotch – just keep the proportions the same.
Irish Cream Ganache
3/4 cup (188 ml) Bailey’s Irish Cream
1 cup (180 g) semi-sweet chocolate chips
- Heat the cream in a sauce pan until it just starts to boil. You’ll want to stir it regularly since you don’t want the cream to burn onto the bottom of the pan.
- Once it boils, add in the chips and remove from heat. Stir until the chips melt and the mixture is smooth.
- Give it a few minutes to cool and then pour over your cake!
Feb 2, 2015 | Appetizers, Egg Free, Nut Free
A long time ago, my wife loved to go to a chain restaurant in the States. This particular chain had a decent hot spinach dip but the closest one to us was about an hour away. Being the diligent and creative husband, I found a recipe to use and then altered it to fit my parameters.
As my wife does not eat spicy food – I have further enhanced and developed this to better suit my tastes. That said, if you don’t enjoy spice – why are you on this site? I mean you can trade out the Pepper Jack for Monterrey Jack cheese and 86 the chili flakes.
HS Spinach Dip
1 1/2 cups (375 ml) half-and-half
8 oz (225 g) grated Pepper Jack cheese
8 oz (250 g) light cream cheese
1 tsp (5 g) garlic powder
1 tbsp (15 g) chili flakes
1 1/2 tsp (8 ml) GF Worcestershire sauce
1.5 lbs (360 g) frozen spinach (thawed and drained)
4 green onions, chopped
- Bring the cream to a simmer over medium heat and add the Pepper Jack, cream cheese, garlic powder, Worcestershire and chili flakes. Continuously stir to prevent sticking until the cheeses melt.
- While slowly stirring, add the spinach and scallions. Stir until mixed and the spinach is wilted.
- Serve hot with Doritos. This could potentially go well as a sauce for pasta …
Jan 13, 2015 | Appetizers, Egg Free, Nut Free

Obviously pre-cooking – I think I ate the majority of these myself.
I recently had a friend that posted a pic of an infant drooling over bacon with a caption of “Love at First Sight”. My first reaction – maybe if it had been jalapenos. Second thought – Stuffed Jalapenos.
That said I love my recipe for Dragon Bites – bacon-wrapped, cheese-stuffed jalapenos. But I’ve found another recipe that rivals it in taste and fire!
Originally, this recipe called for Parmesan cheese and was nowhere near as spicy. I changed that and now these cheese and sausage stuffed jalapenos are equally as fantastic as the Dragon Bites with a lot less work …
Atomic Peppers
12 large jalapenos (about 3 inches long)
1 lb. (250 g) spicy GF sausage
8 oz. (250 g) cream cheese
8 oz. (225 g) Pepper Jack Cheese
1 tbsp (15 g) minced garlic
1 tbsp (15 g) crushed red peppers
1 green onion
- Preheat your oven to 425 degrees.
- While your sausage is frying up with your garlic and red peppers, wash and slice the peppers in half lengthwise so they form small boats.
- Drain your sausage and mix with your shredded cheese, diced green onions and cream cheese. You may have to get in with your hands to ensure that it mixes well.
- Spoon 1 large tablespoon into each boat and then cook for about 20 minutes or they just start to brown.
- Serve and enjoy!
Nov 16, 2014 | Breakfast, Nut Free
One of the first things I learned to cook for myself back in the day was French Toast. I learned that recipe from my Nanny. And that started a lifelong love of cooking but not of breakfast. That I can thank my mother for – she always loved breakfast. But her usual dish didn’t vary too much from toast, over easy eggs, grits and bacon.
Well as a person with Celiac’s, both the toast and the French Toast have become infinitely harder to manage, not impossible, but harder. One of these days I’ll throw on my Citrus French Toast recipe with a Bailey’s Anglais. And at this point, I can see I’m about to veer way off course. So I’ll just stop my digressing with – I love breakfast!
So this recipe is fun and easy to do. It’s called a Pig Sty because it’s got bacon and it’s messy to make and eat. But it’s so fun and good!
Pig Sty
1 very large red onion
7-8 strips of thick bacon
5 cups (1 kg) shredded hash browns
7-8 eggs (better if they are smaller)
Cayenne – to taste
Seasoning Salt – to taste
Pepper Jack Cheese
- Preheat your oven to about 425 F. While that is working spray down a lipped pan with cooking spray.
- Cut the onions so that you have about 7-8 really large rings about 3/4 inch tall. Place a piece of bacon on the inside of the ring creating a circle.
- Mix your hash browns with one egg and seasoning salt so that it just coats the browns. Fill the bacon-onion rings with hash browns and cook for about 25 minutes – the biggest priority is to ensure that the bacon is cooked.
- Making an indention in the centre of the hash browns, crack one egg into each ring and then cook the whole thing for another seven minutes.
- Top with shredded Pepper Jack and Cayenne, cooking until the cheese is melted (two minutes give or take).
- Serve with some gluten free toast with cream cheese and pepper jelly (this recipe will be coming soon as well!)
